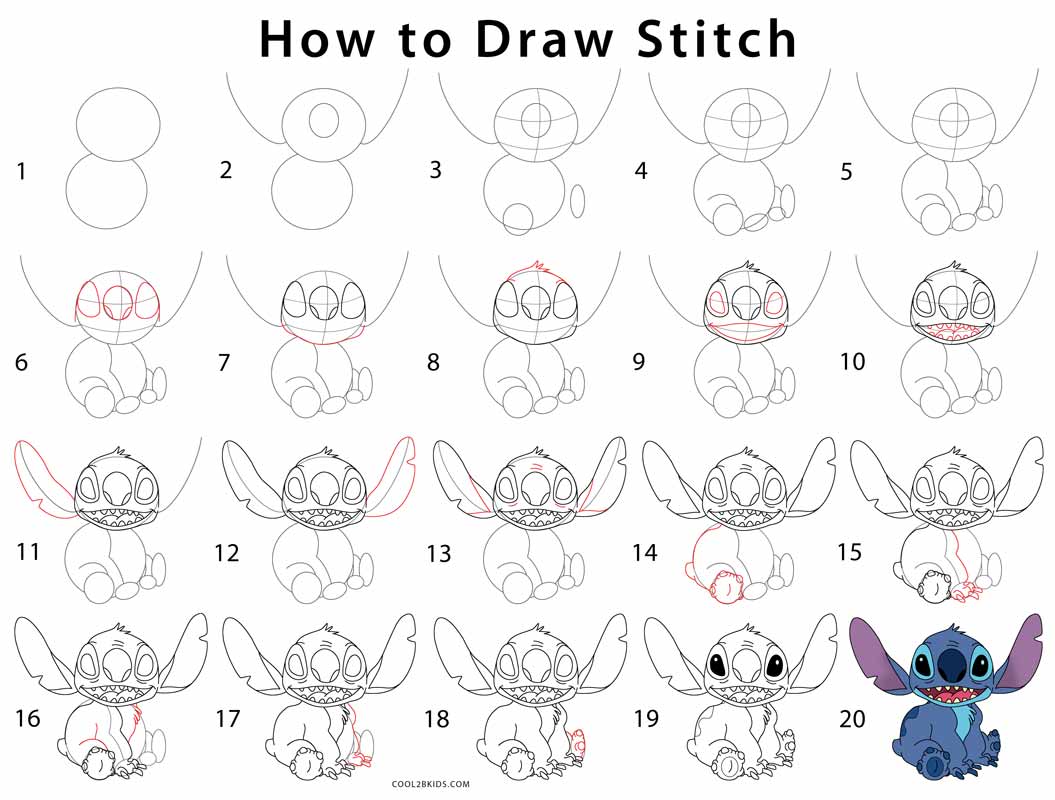
**Today, we're embarking on an exciting artistic journey: learning how to draw Stitch from Disney's beloved *Lilo & Stitch* movie. This mischievous yet lovable alien, also known by his birth name Experiment 626, has captured hearts worldwide with his unique charm and boundless energy. Whether you're a complete beginner eager to pick up a pencil or an experienced artist looking for a fun new character to sketch, this comprehensive guide will walk you through every step, ensuring you create a truly fantastic rendition of this iconic character.** We hope you follow along with us, armed with nothing more than your enthusiasm and a few basic drawing supplies. Get ready to transform a blank piece of paper into your very own adorable Stitch! Drawing Stitch offers a delightful break from the more conventional subjects. Perhaps you've spent countless hours perfecting princesses with their shiny tiaras and frilly gowns. While those royal artworks are certainly enchanting, there's a unique satisfaction in capturing the spirited essence of Stitch – a character marked by his short temper and mischievous behavior, which paradoxically endears him deeply to his friend Lilo, who adopted him as her "puppy dog." This tutorial focuses on how to draw him sitting in a nice, symmetrical fashion, a pose that, while seemingly simple, allows for a clear focus on his distinct shapes and proportions. By concentrating on making his shapes evenly balanced, you are bound to end up with a really nice drawing of this popular movie character. --- **Table of Contents:** 1. [The Enduring Appeal of Stitch: Why Draw Experiment 626?](#the-enduring-appeal-of-stitch-why-draw-experiment-626) 2. [Essential Supplies for Your Stitch Drawing Adventure](#essential-supplies-for-your-stitch-drawing-adventure) 3. [Getting Started: Laying the Foundation for Your Stitch Sketch](#getting-started-laying-the-foundation-for-your-stitch-sketch) * [The Squished Circle: Stitch's Head Guide](#the-squished-circle-stitchs-head-guide) * [Guiding Lines: Finding Stitch's Facial Symmetry](#guiding-lines-finding-stitchs-facial-symmetry) 4. [Detailing Stitch's Distinctive Features](#detailing-stitchs-distinctive-features) * [Eyes That Sparkle (Or Misbehave!)](#eyes-that-sparkle-or-misbehave) * [The Iconic Stitch Nose and Mouth](#the-iconic-stitch-nose-and-mouth) 5. [Crafting Stitch's Body: From Torso to Tiny Toes](#crafting-stitchs-body-from-torso-to-tiny-toes) 6. [Adding the Finer Touches: Making Your Stitch Drawing Pop](#adding-the-finer-touches-making-your-stitch-drawing-pop) 7. [Bringing Stitch to Life: The Power of Color](#bringing-stitch-to-life-the-power-of-color) 8. [Pro Tips for an Effortless Stitch Drawing Experience](#pro-tips-for-an-effortless-stitch-drawing-experience) --- ## The Enduring Appeal of Stitch: Why Draw Experiment 626? Stitch, officially known as Experiment 626, is a character unlike any other. Created by Dr. Jumba Jookiba as a genetic experiment designed for chaos and destruction, he finds an unexpected home and family on Earth with a young Hawaiian girl named Lilo Pelekai. His journey from destructive alien to a beloved member of a unique 'ohana (family) resonates deeply with audiences of all ages. This complex character, with his short temper, mischievous antics, yet undeniable capacity for love and loyalty, makes him a fascinating subject for any artist. Drawing Stitch isn't just about replicating a character; it's about capturing a personality. His expressive eyes, large ears, and distinctive features tell a story. For many, the appeal lies in his unique blend of cuteness and chaos. He's not a perfect, pristine character; he has chipped ears and a slightly disheveled look, which makes him all the more relatable and fun to draw. Learning how to draw Stitch drawing allows you to explore cartooning techniques, character design, and the art of conveying emotion through simple lines and shapes. It's an excellent exercise for improving your observational skills and understanding basic anatomy, even if it's alien anatomy! Plus, the satisfaction of creating your own rendition of this beloved Disney figure is immeasurable. ## Essential Supplies for Your Stitch Drawing Adventure Before we dive into the steps of how to draw Stitch drawing, let's gather our materials. The beauty of drawing is that you don't need an elaborate setup. Simplicity is key, especially when you're just starting out or drawing for fun. The "Data Kalimat" mentions "all you need is something to draw with, paper, and coloring supplies." This is a perfect starting point. Here's a list of the supplies we recommend, but remember, feel free to use whatever you have readily available in your home or classroom. The most important thing is to be comfortable with your tools: * **Something to Draw With:** A **Sharpie** (as suggested in the data) is excellent for creating bold, clean lines, especially for the final outline. However, you can absolutely start with a **pencil** for your initial sketches and guide lines. A mechanical pencil offers consistent line thickness, while a traditional wooden pencil provides versatility. * **Paper:** Any standard drawing paper will do. We often use marker paper for a smoother finish, but regular printer paper, sketchbook paper, or even construction paper works perfectly. Don't worry about perfection; focus on the process. * **Eraser:** A good quality eraser is crucial for correcting mistakes and, more importantly, for cleaning up your guide lines once your final drawing takes shape. Kneaded erasers are fantastic for lifting graphite without damaging the paper. * **Coloring Supplies:** Once your how to draw Stitch drawing is complete, you'll want to bring him to life with color! Options include: * **Crayons:** Great for young artists and vibrant, solid colors. * **Colored Pencils:** Allow for blending, shading, and finer details. * **Markers:** Provide bold, even color coverage, perfect for cartoon characters. * **Paint (watercolor or acrylic):** For a more painterly approach, though perhaps more advanced. * Stitch's primary color is blue, with lighter blue for his belly and inner ears, and pink for his nose and paw pads. Having these colors on hand will be helpful. Having these basic tools will set you up for success. Remember, the quality of your drawing comes more from your practice and understanding of the steps than from expensive art supplies. ## Getting Started: Laying the Foundation for Your Stitch Sketch Every great drawing begins with a solid foundation. For how to draw Stitch drawing, we'll start with simple geometric shapes that act as guides. These initial lines don't need to be perfect; they're merely there to help you establish proportion and placement before you add details. Think of them as the skeleton of your drawing. This approach is common in cartooning and character design, making complex figures approachable. ### The Squished Circle: Stitch's Head Guide The first step, as suggested in the data, is to "draw a circle that’s a little bit squished down." This will serve as the primary guide for Stitch's head. Don't stress about making it a perfect circle; an irregular, slightly flattened oval shape works perfectly. It's just a guide, after all. This initial shape helps you determine the overall size and placement of Stitch on your paper. Once you have your squished circle, you'll want to add some internal guide lines. "Inside the circle draw two lines, one vertical and one horizontal." These lines are crucial for establishing the symmetry and perspective of Stitch's face. When drawing these lines, "bend them slightly so that they contour to the shape of the sphere." This means they shouldn't be perfectly straight but should curve gently, following the natural curve of the head shape. The vertical line will help you center his facial features, while the horizontal line will indicate the eye level. These simple guides are fundamental for achieving a balanced and proportional Stitch drawing. ### Guiding Lines: Finding Stitch's Facial Symmetry With the head guide and central lines in place, it's time to add guides for Stitch's ears and the general outline of his face. "Add the guides for stitch's ears by first drawing two vertical lines on top of the head." Pay close attention to the length of these lines in relation to the circle. Stitch's ears are quite prominent, so these initial lines should extend a fair bit above the main head circle. Next, you'll start shaping the head more specifically. The data mentions: "On the left side, draw a long line that curves out and down and meets the circle at the bottom." You'll do something similar on the right side to create the overall shape of his head, which is somewhat wider at the top and narrows slightly towards the chin. Remember, these are still light, erasable guide lines. The goal here is to block out the major components of Stitch's form before committing to the final lines. This systematic approach is key to an easy and successful how to draw Stitch drawing. ## Detailing Stitch's Distinctive Features Now that the basic structure is in place, we can begin to "add in details for Stitch's face." This is where Stitch's unique personality truly begins to emerge on your paper. There is quite a bit of detail to add in here, so take your time and refer back to reference images of Stitch if needed. Precision in these steps will make your how to draw Stitch drawing truly recognizable. ### Eyes That Sparkle (Or Misbehave!) Stitch's eyes are one of his most expressive features. They are large, wide-set, and convey a range of emotions from mischievousness to sadness. For the eyes, the data suggests: "draw three successively smaller, irregular rounded shapes, one within the other." This layering technique creates depth and the iconic look of his eyes. Start with the largest, outermost shape – a half or full oval, depending on the angle and expression you're aiming for. These shapes should sit on or just above the horizontal guide line you drew earlier. Then, inside that, draw a slightly smaller, similar shape for the iris. Finally, within the iris, draw the smallest, darkest shape for the pupil. You can add a tiny white circle or dot within the pupil for a sparkle, giving his eyes life. Remember, Stitch's eyes are often depicted with a slight glint, even when he's being naughty. ### The Iconic Stitch Nose and Mouth Moving to the center of his face, the nose is a defining characteristic. "Draw a large circle for the nose, using curved lines to indicate the nostrils." This large, somewhat flattened oval shape should sit just below the intersection of your vertical and horizontal guide lines. The nostrils are typically two small, curved lines within the bottom half of this circle. Below the nose, you'll define his mouth. "Draw in the mouth line, along with teeth." Stitch's mouth is wide and often shows his prominent teeth, which are typically small, sharp triangles. The mouth line itself can be a simple curved line for a closed or slightly smiling expression, or a more open, jagged line if you want to depict him mid-growl or laugh. Pay attention to the mischievous curl his mouth often takes. Adding these details carefully will significantly enhance your how to draw Stitch drawing. ## Crafting Stitch's Body: From Torso to Tiny Toes With Stitch's head and face taking shape, it's time to connect it to his distinctive body. As mentioned, this tutorial focuses on drawing him in a sitting, symmetrical fashion, which makes it easier to establish his proportions. His body is compact and rounded, reflecting his powerful yet adorable physique. Begin by drawing a rounded, somewhat pear-shaped body directly beneath his head. This shape should be wider at the top, just below his head, and narrow slightly towards his hips. Think of it as a slightly elongated oval. Since he's sitting, his torso will be relatively short. Next, we'll tackle his limbs. "Draw the legs for Stitch according to the following steps step 10." (Note: The "step 10" refers to the original data's sequence, but here it's part of our logical flow). His legs are short and sturdy. For the sitting pose, his thighs will extend outwards from his body, with his lower legs bent at the knees and his feet pointing forward. Use simple curved lines and rounded shapes to define his upper legs, knees, and lower legs. His feet are relatively small and rounded, with three prominent toes. Remember to add the small, oval-shaped paw pads on the bottom of his feet. His arms will extend from his shoulders, which are close to his head. They are also short and muscular, ending in hands with three fingers and a thumb. Since he's sitting symmetrically, his arms might be resting on his lap or slightly to his sides. Use gentle curves to outline his arms, ensuring they match the overall rounded aesthetic of his body. Connecting these body parts smoothly to the head is crucial for a cohesive how to draw Stitch drawing. ## Adding the Finer Touches: Making Your Stitch Drawing Pop Once the main shapes and features are in place, it's time to refine your how to draw Stitch drawing with smaller details that truly bring him to life. These are the elements that give him his unique character and mischievous charm. "Draw more small details for the Stitch step 11" (again, referring to the data's sequence). One of the most noticeable details is "the little tuft of fur sticking up at the top of Stitch's head." This is a small, spiky cluster of fur that adds to his wild, alien appearance. Draw this directly above his forehead, using a few short, jagged lines. Next, consider his ears. While you've drawn the guides, now you'll refine their shape. Stitch's ears are large and bat-like, often depicted with a slight curve or fold. Importantly, "add some scars for Stitch, who has some chipped or scarred portions on his ear." This detail adds to his backstory as Experiment 626 and makes him feel more authentic. These can be small nicks or irregular shapes along the edges of his ears. You'll also want to add details to his hands and feet, such as the lines indicating his claws or the slight creases on his knuckles. Don't forget the small, oval-shaped pads on his hands and feet, which are typically a lighter shade of blue or pink. Finally, "detail Stitch's face, erasing guide lines as necessary." This is the stage where you go over your pencil lines with a darker drawing tool (like a Sharpie or a darker pencil) to create your final outline. As you do this, carefully erase any visible guide lines from your initial sketch. This clean-up process makes your how to draw Stitch drawing look professional and polished. Pay attention to the thickness of your lines; thicker lines can indicate areas of shadow or emphasize certain features. ## Bringing Stitch to Life: The Power of Color Once your how to draw Stitch drawing is fully outlined and all guide lines are erased, it's time for the most exciting part: adding color! "Let’s color to complete the picture." This step truly brings Stitch to life, transforming your lines into a vibrant character ready to leap off the page. Stitch's primary color scheme is iconic and instantly recognizable. He is predominantly a vibrant blue. His belly and the insides of his ears are a lighter shade of blue, almost a sky blue or light teal. His nose and the pads on his hands and feet are typically pink. His claws are usually a darker blue or black, and his eyes are black with white highlights. When coloring, consider the direction of your strokes to create a smooth, even application. If you're using colored pencils, you can layer colors to create depth and subtle shading. For example, you might use a slightly darker blue in areas that would naturally be in shadow, like under his chin or where his limbs meet his body. If you're using markers, try to color in one direction to avoid streaking. Don't be afraid to experiment with different shades of blue to give your Stitch drawing more dimension. The key is to have fun with it! Coloring is a relaxing and rewarding part of the artistic process, allowing you to express your creativity and truly make the character your own. A well-colored Stitch drawing stands out and captures the lively spirit of Experiment 626. ## Pro Tips for an Effortless Stitch Drawing Experience Drawing, like any skill, benefits from practice and a few insider tips. While we've covered the step-by-step process of how to draw Stitch drawing, here are "3 more tips to make your Lilo and Stitch drawing easy" and ensure you achieve a fantastic result. These insights come from experienced artists and are designed to help you overcome common challenges and enhance your artistic journey. 1. **Focus on Symmetrical Balance:** The "Data Kalimat" emphasizes, "If students focus on making his shapes evenly balanced, they are bound to end up with a really nice drawing of this popular movie character." Stitch, especially in a sitting pose, benefits greatly from symmetry. Use your initial guide lines (the vertical and horizontal crosshairs) to ensure his eyes are level, his ears are proportionate, and his body is centered. Periodically step back from your drawing to view it from a distance. This helps you spot imbalances or areas that need adjustment before you commit to final lines. A mirror can also be a useful tool; looking at your drawing's reflection can reveal flaws you might not notice otherwise. 2. **Embrace Imperfection and Practice:** Remember, "You don't have to draw the circle perfectly." This applies to all your initial guide lines and even your final drawing. Art is not about robotic precision; it's about expression and capturing the essence of your subject. Every artist, no matter their skill level, makes mistakes. The key is to view them as learning opportunities. Don't be afraid to erase and redraw. The more you practice drawing Stitch, the more comfortable you'll become with his shapes and proportions, and the easier it will be to achieve a result you're proud of. Consistent practice builds muscle memory and sharpens your eye for detail. 3. **Use References and Break Down Complexities:** While this tutorial provides detailed steps, always feel free to consult additional reference images of Stitch from the *Lilo & Stitch* movie or official Disney artwork. Observing how animators portray his expressions, body language, and specific details can provide invaluable insight. When faced with a seemingly complex part of the drawing, remember the principle of breaking it down into simpler shapes. For instance, an ear might seem intricate, but it's essentially a series of curved lines and ovals. This systematic approach, as seen in this how to draw Stitch drawing guide, makes any drawing project manageable and enjoyable. By incorporating these tips, you'll not only improve your how to draw Stitch drawing but also develop fundamental artistic skills that will serve you well in any future creative endeavors. --- ## Conclusion We hope you've had a fantastic time learning how to draw Stitch from *Lilo & Stitch* today! From laying down those initial squished circles to adding the mischievous glint in his eyes and the scars on his ears, you've journeyed through the entire process of bringing Experiment 626 to life on paper. Remember, all you needed was something to draw with, paper, and coloring supplies, proving that great art can be created with simple tools and a little guidance. Whether you're a beginner or just love drawing cute characters, the joy of creating your own Stitch is immense. This process isn't just about replicating a character; it's about understanding shapes, proportions, and the magic of visual storytelling. Stitch, with his unique blend of chaos and charm, is a testament to the power of character design, and now you have the skills to capture that essence yourself. We encourage you to continue practicing, experimenting with different poses, and perhaps even drawing Stitch alongside Lilo, performing a Hawaiian dance as they love to do! Share your creations with friends and family, and don't hesitate to share your thoughts or questions in the comments below. What other characters would you like to learn how to draw? Your artistic adventure has just begun, and we're thrilled to have been a part of it. Keep drawing, keep creating, and most importantly, have fun!
Address : 78921 Rudy Forks
Lake Cecilfurt, ID 21709-1524
Phone : (520) 728-1631
Company : Reinger Group
Job : Embossing Machine Operator
Bio : Vitae iure aut distinctio eveniet dolor. Et ex voluptatem rerum omnis. Omnis ut omnis sunt quis. Porro exercitationem cumque et amet molestias qui omnis iste. Maiores porro quas porro veniam tenetur.