Mastering Flame Drawing: Ignite Your Art With Fiery Techniques
Embarking on the journey of flame drawing can be one of the most captivating and rewarding experiences for any artist, whether you're a seasoned professional or just picking up a pencil for the first time. Fire, with its mesmerizing dance of light, heat, and unpredictable movement, presents a unique challenge and an incredible opportunity to infuse dynamism and passion into your artwork. This comprehensive guide will illuminate the path, transforming the seemingly complex task of depicting flames into an accessible and enjoyable creative endeavor. You'll discover the fundamental principles that govern the appearance of fire, from its basic shapes to the intricate interplay of colors that give it life, ensuring your artistic expressions burn brighter than ever before.
Understanding how to draw flames realistically can be a beautiful addition to many artworks, offering versatility across various artistic applications. From adding dramatic flair to a fantasy scene to depicting a cozy campfire, mastering the art of flame drawing opens up a world of creative possibilities. This reading will be perfect to learn some basic concepts of light emitted by fire, and how to represent flames realistically, providing you with the essential tools and techniques to bring your fiery visions to life on paper or screen. We must start with the basics to reach the most intricate details, building a solid foundation for your artistic growth.
Table of Contents
- Understanding the Anatomy of a Flame: The Basics of Fire
- Essential Tools and Materials for Flame Drawing
- The Basic Steps of Flame Drawing: From Guide to Form
- Mastering Color: Bringing Your Flames to Life
- Achieving Realistic Flames: Light, Shadow, and Movement
- Exploring Different Styles: From Cartoon to Stylized Flames
- Common Mistakes in Flame Drawing and How to Avoid Them
- Advanced Techniques and Creative Applications
Understanding the Anatomy of a Flame: The Basics of Fire
Before we even pick up a pencil, it's crucial to understand what makes a flame look like a flame. Fire is not a static object; it's a dynamic phenomenon, constantly shifting, flickering, and changing shape. This movement is key to capturing its essence in a drawing. A flame typically has a wider base and tapers upwards to a point, often with multiple "tongues" or "flares" extending from the main body. The core is the hottest and brightest part, while the outer edges are cooler and less intense. Observing real fire, even just a candle flame, can provide invaluable insights. Notice how the light emanates from the center, how smoke might curl upwards, and how the colors transition. This observation forms the bedrock of realistic flame drawing. By understanding these fundamental characteristics, you'll be better equipped to translate them onto your canvas. Remember, fire is a living entity in your artwork, and giving it that sense of life begins with understanding its structure and behavior.Essential Tools and Materials for Flame Drawing
To begin your flame drawing journey, you don't need an extensive array of expensive tools. Simplicity is often the key, especially when you're starting. Here’s a breakdown of what you might find useful:- Pencils: A range of graphite pencils (e.g., HB, 2B, 4B, 6B) will allow you to create varying degrees of lightness and darkness, crucial for establishing form and shadow.
- Paper: Any standard drawing paper will suffice, but a slightly textured paper can sometimes help with blending and layering colors.
- Eraser: A kneaded eraser is excellent for lifting graphite without smudging, and a standard rubber eraser for sharper corrections.
- Blending Tools: Tortillons (paper stumps) or even cotton swabs can help you achieve smooth transitions in your shading.
- Coloring Mediums: While you can certainly create stunning monochrome flame drawings, color brings fire to life.
- Markers: Markers can be a good option for brighter looking colors, offering vibrant hues and smooth application.
- Colored Pencils: Excellent for detailed work and layering colors to create depth.
- Pastels: Soft pastels or oil pastels can create a very fiery, ethereal glow, perfect for capturing the airy quality of flames.
- Digital Tools: If you're drawing digitally, a tablet and software like Photoshop, Procreate, or Clip Studio Paint offer immense flexibility for layering, blending, and experimenting with colors.
The Basic Steps of Flame Drawing: From Guide to Form
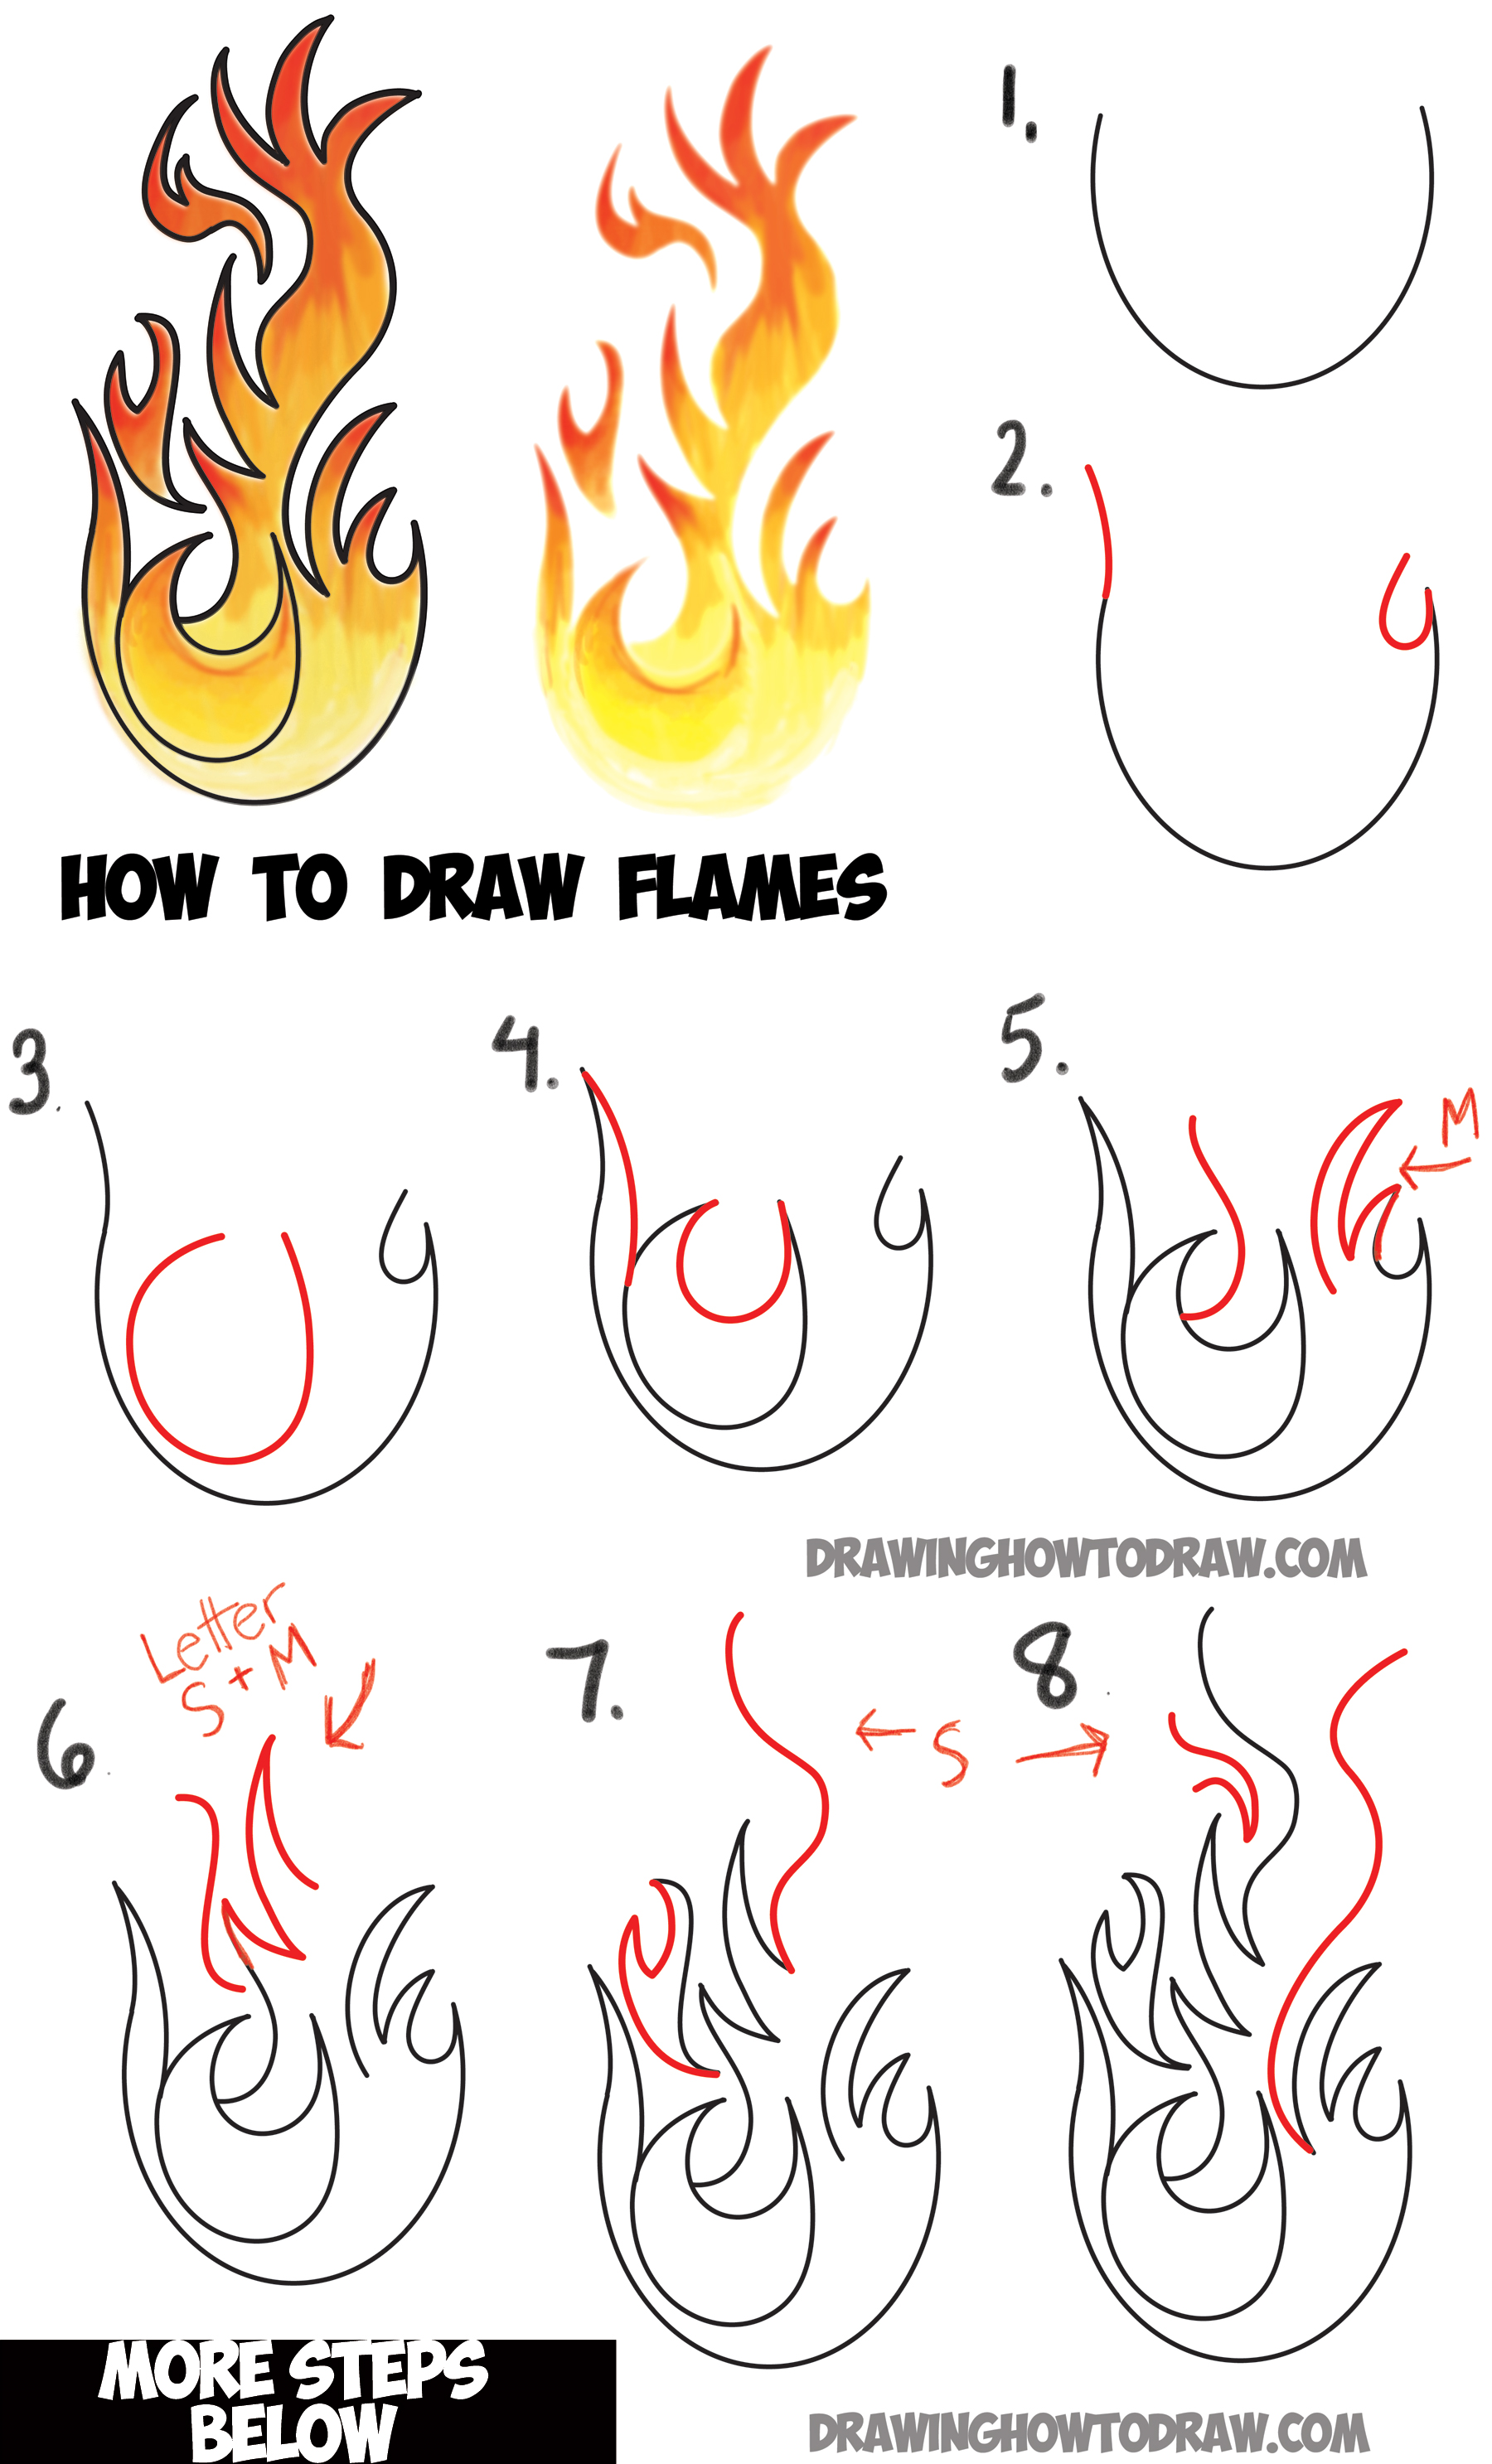
Let's dive into the practical steps of creating a compelling flame drawing. We'll start with the foundational shapes and build up to more complex details. This systematic approach ensures you capture the dynamic essence of fire.Establishing Your Initial Guide
Every great drawing begins with a solid foundation. For flame drawing, this means establishing a simple guide that will dictate the overall shape and height of your fire.- Start with Basic Shapes: Begin by lightly sketching the general outline of your flame. Think of it as a loose, elongated teardrop or an irregular, upward-pointing oval. This initial shape doesn't need to be perfect; it's just a placeholder for your flame's body.
- Add Height and Irregularity: To give your flames height and irregularity, draw angled isosceles triangles along the top of the peaks of your initial shape. These triangles will serve as the sharp, flickering tips of your flames, giving them that characteristic upward thrust and unpredictable nature. Don't make them uniform; vary their sizes and angles to create a more natural look.
- Refine the Outline: Once your guide is in place, draw your flames using the triangles as references for where the tips should go. Connect these tips to the main body of your flame with smooth, curving lines. Remember that fire is fluid, so avoid stiff, straight lines. Each point of flare should dip outwards and then inwards while curving sharply towards the pointed part, mimicking the way real flames dance and curl.
Adding the First Flaming Flares
Once the basic outline is established, it's time to introduce the internal movement and complexity that defines a flame. This involves adding the first flaming flares. In this second step, we are going to begin to draw the flared points of the flame. These are the smaller, individual licks of fire that separate from the main body, contributing to the flame's dynamic appearance.- Internal Curves: Inside your main flame shape, start drawing smaller, upward-curving lines that mimic the shape of the outer flame. These lines represent the internal layers and movements of the fire. Think of them as smaller flames within the larger one.
- Varying Sizes and Directions: Don't make these internal flares uniform. Some should be taller, some shorter, some leaning slightly to one side, others to the other. This variation is crucial for creating a natural, flickering effect.
- Overlap and Intersect: Allow these internal lines to overlap and intersect. Fire is not a solid mass; it's composed of multiple overlapping sections, constantly swirling and changing. This layering adds a sense of depth and movement.
Layering for Depth and Movement
To make your fire drawing more realistic, add additional layers of flames within the existing structure. This step helps create a sense of movement, as fire has multiple overlapping sections.- Draw Another Smaller Flame Shape: Inside the ones you previously sketched, draw another smaller flame shape, keeping the lines varied. This creates the illusion of depth, as if you're looking into the heart of the flame.
- Add the Final Inner Layer: Continue this process, adding the final inner layer. This innermost layer will typically be the brightest and hottest part of your flame. The more layers you add, the more complex and dynamic your flame will appear.
- Refine and Connect: As you add layers, continuously refine the lines, ensuring they flow smoothly and organically. The goal is to create a cohesive, flickering entity rather than a series of disconnected shapes.
Mastering Color: Bringing Your Flames to Life
Color is where your flame drawing truly ignites. The effective utilization of colors is paramount to achieving a very specific airy quality within your fire. Understanding the color gradients of a flame is crucial for realism and impact. The general rule for coloring fire is to use a gradient from the hottest (brightest) colors at the core to the cooler (darker) colors at the edges.- Inner Core (Yellow/White): The hottest part of the flame is typically depicted as bright yellow, sometimes even white or a very light cream. This is where the combustion is most intense.
- Middle Section (Orange): As you move outwards from the core, the color transitions to a vibrant orange. This represents a slightly cooler, but still very hot, part of the flame.
- Outer Edges (Red/Dark Orange): The outermost part of the flame and the sparks are usually red or a dark, deep orange. This is the coolest part of the visible flame, where it interacts with the surrounding air.
- Smoke/Soot (Black/Grey): If you're including smoke, it would typically be black or dark grey, especially at the tips or where the flame is less efficient.
Achieving Realistic Flames: Light, Shadow, and Movement
Representing flames realistically goes beyond just shape and color; it involves understanding how fire interacts with its environment through light and shadow, and how to convey its inherent movement. This reading will be perfect to learn some basic concepts of light emitted by fire, and how to represent flames realistically.- Light Emission: Fire is a light source. This means it casts light onto surrounding objects. Consider where your flame is positioned and how its glow would illuminate nearby surfaces. The light would be brightest closest to the flame and diminish with distance. This also means that parts of the flame itself will be brighter (the core) and parts will be slightly less bright (the outer edges), creating internal highlights and subtle shadows.
- Dynamic Movement: Fire is never still. To convey this, your lines should be fluid and varied. Avoid perfectly symmetrical shapes. Introduce slight wobbles, subtle curls, and varying lengths in your flame tongues. The layering technique we discussed earlier is key here, as overlapping forms naturally suggest movement. Think about how wind might affect the flame, causing it to lean or flicker.
- Subtle Details: Consider adding tiny sparks or embers detaching from the main flame, especially towards the top. These small details can significantly enhance the realism and sense of energy. Also, a subtle glow around the flame, extending slightly beyond its physical boundaries, can create a powerful atmospheric effect.
- Interaction with Smoke: If your flame is producing smoke, consider how it rises and curls. Smoke often follows the general upward movement of the flame but can then swirl and dissipate. Learning how to draw fire and smoke with various techniques, colors, and styles will greatly enhance your ability to create a complete and believable fiery scene.
Exploring Different Styles: From Cartoon to Stylized Flames
Flame drawings are very versatile and can be utilized in various ways. While realism is a compelling goal, the beauty of art lies in its diversity. You can learn how to draw flames in different styles and situations with these 17 flame drawing ideas, ranging from whimsical cartoon flames to highly stylized interpretations. The fundamental principles remain, but the application changes.Drawing Cartoon Flames
Cartoon flames often prioritize simplicity, exaggerated shapes, and clear outlines. They are less about realistic light and shadow and more about conveying the idea of fire in a fun, recognizable way.- Simplified Shapes: Cartoon flames often use smoother, more rounded shapes compared to the jagged edges of realistic fire. They might look like simplified teardrops or even blobs with a few upward points.
- Bold Outlines: Strong, consistent outlines are common in cartoon styles, helping the flame stand out.
- Exaggerated Movement: While simplified, cartoon flames can still convey movement through exaggerated curves and swirls.
- Limited Color Palette: Often, cartoon flames use fewer color transitions, perhaps just a bright yellow and orange, or even a single color.
- Add a "Sparkle" or "Twinkle" Effect: A few small, simple stars or circles around the flame can instantly add a cartoonish sparkle.
- Give it Personality: In some cartoon styles, you might even give the flame eyes or a mouth to convey emotion!
- Exaggerate the "Whoosh": Add motion lines or speed lines behind the flame to suggest rapid movement or heat.
- Play with Proportions: Now that you have created this drawing of a cartoon flame, you could make it look even bigger or maybe change the shape to be wider or taller, experimenting with comical or dramatic proportions.
Common Mistakes in Flame Drawing and How to Avoid Them
Even experienced artists can fall into common traps when drawing fire. Being aware of these pitfalls can significantly improve your flame drawing.- Symmetry and Uniformity: Fire is inherently asymmetrical and irregular. A common mistake is to draw flames that are too perfectly symmetrical or that have identical "tongues."
- Solution: Embrace irregularity. Vary the height, width, and angle of each flame lick. Introduce subtle wobbles and unpredictable curves.
- Flatness (Lack of Depth): Without proper layering and color transitions, flames can look flat and two-dimensional.
- Solution: Implement the layering technique discussed earlier. Use the yellow-orange-red gradient consistently, ensuring smooth blends. Think of the flame as having volume, not just an outline.
- Static Appearance: Fire is movement. A static flame drawing lacks the energy and life that makes fire so captivating.
- Solution: Use dynamic, flowing lines. Add subtle flickers, wisps, and sparks. Consider the direction of air currents or wind affecting the flame's shape.
- Incorrect Color Application: Placing the brightest colors on the outside or using too many distinct, unblended colors can make the flame look artificial.
- Solution: Always remember the core-to-edge color rule: yellow/white inside, orange in the middle, red/dark orange on the outside. Blend colors seamlessly to create smooth transitions.
- Ignoring Light and Shadow: For realistic flames, failing to consider how the flame acts as a light source can make the drawing look unconvincing.
- Solution: Imagine the light emanating from the flame. Add highlights to nearby objects and subtle internal shadows within the flame itself to give it form.
Advanced Techniques and Creative Applications
Once you've mastered the basics, the world of flame drawing expands. You can learn how to draw fire and smoke with various techniques, colors, and styles, pushing the boundaries of your artistic expression.- Textural Effects: Experiment with different strokes and mediums to create texture within your flames. For instance, dry brushing with pastels can give a smoky, ethereal quality, while sharp lines with colored pencils can suggest intense heat.
- Reflections and Translucency: Consider how flames might reflect off shiny surfaces or how their light might pass through translucent objects, creating interesting visual effects.
- Environmental Interaction: How does the flame interact with its environment? Does it cast a glow on a character's face? Is it burning wood, and how does that affect its shape and color? Integrating the flame with its surroundings adds depth and narrative.
- Stylized Effects: Beyond cartoon flames, explore highly stylized fire. This could involve abstract shapes, geometric patterns, or even using non-traditional colors to convey a specific mood or magical effect. See examples of flame drawings for different purposes and styles, and get a free drawing guide from various online art communities or resources.
- Digital Painting Techniques: For digital artists, layers, blending modes (like "add" or "screen"), and glow effects can create incredibly vibrant and realistic flames with relative ease. Experiment with different brushes to simulate the flickering motion.
Conclusion
Mastering flame drawing is a journey of observation, practice, and creative exploration. We've covered the essential steps, from laying down your initial guides with angled isosceles triangles for height and irregularity, to adding the first flaming flares where each point dips outwards and inwards, to layering additional flame shapes within for depth and movement. We've also delved into the crucial aspect of color, understanding that making the outer part of the flame red, the middle part orange, and the inner part yellow is key to achieving that vibrant, airy quality. Whether you're aiming for a realistic depiction or a whimsical cartoon flame drawing, the principles of fluidity, light, and dynamic shape remain paramount. Remember, you have the basics down, and now you can customize it as you wish. Don't be afraid to experiment with different mediums, styles, and creative applications. The beauty of flame drawing lies in its versatility and its ability to add a powerful visual element to any artwork. We encourage you to continue practicing, observing real fire, and exploring new techniques. For further inspiration and resources, you can often find & download free graphic resources for flame drawing vectors, stock photos & PSD files online, many of which are free for commercial use high quality images. Share your fiery creations with us in the comments below, or tell us what other elements of nature you'd like to learn to draw next! Your artistic journey has just begun to ignite.- Vegamovies 60fpa
- Jackerman New Video Release Date
- Masa 49come
- Movierulz Today 2025
- Anthea Norman Taylor

How to Draw Flames: 14 Steps (with Pictures) - wikiHow
How to Draw Flames and Drawing Cartoon Fire Drawing Tutorial – How to

How to Draw Flames: 14 Steps (with Pictures) - wikiHow
