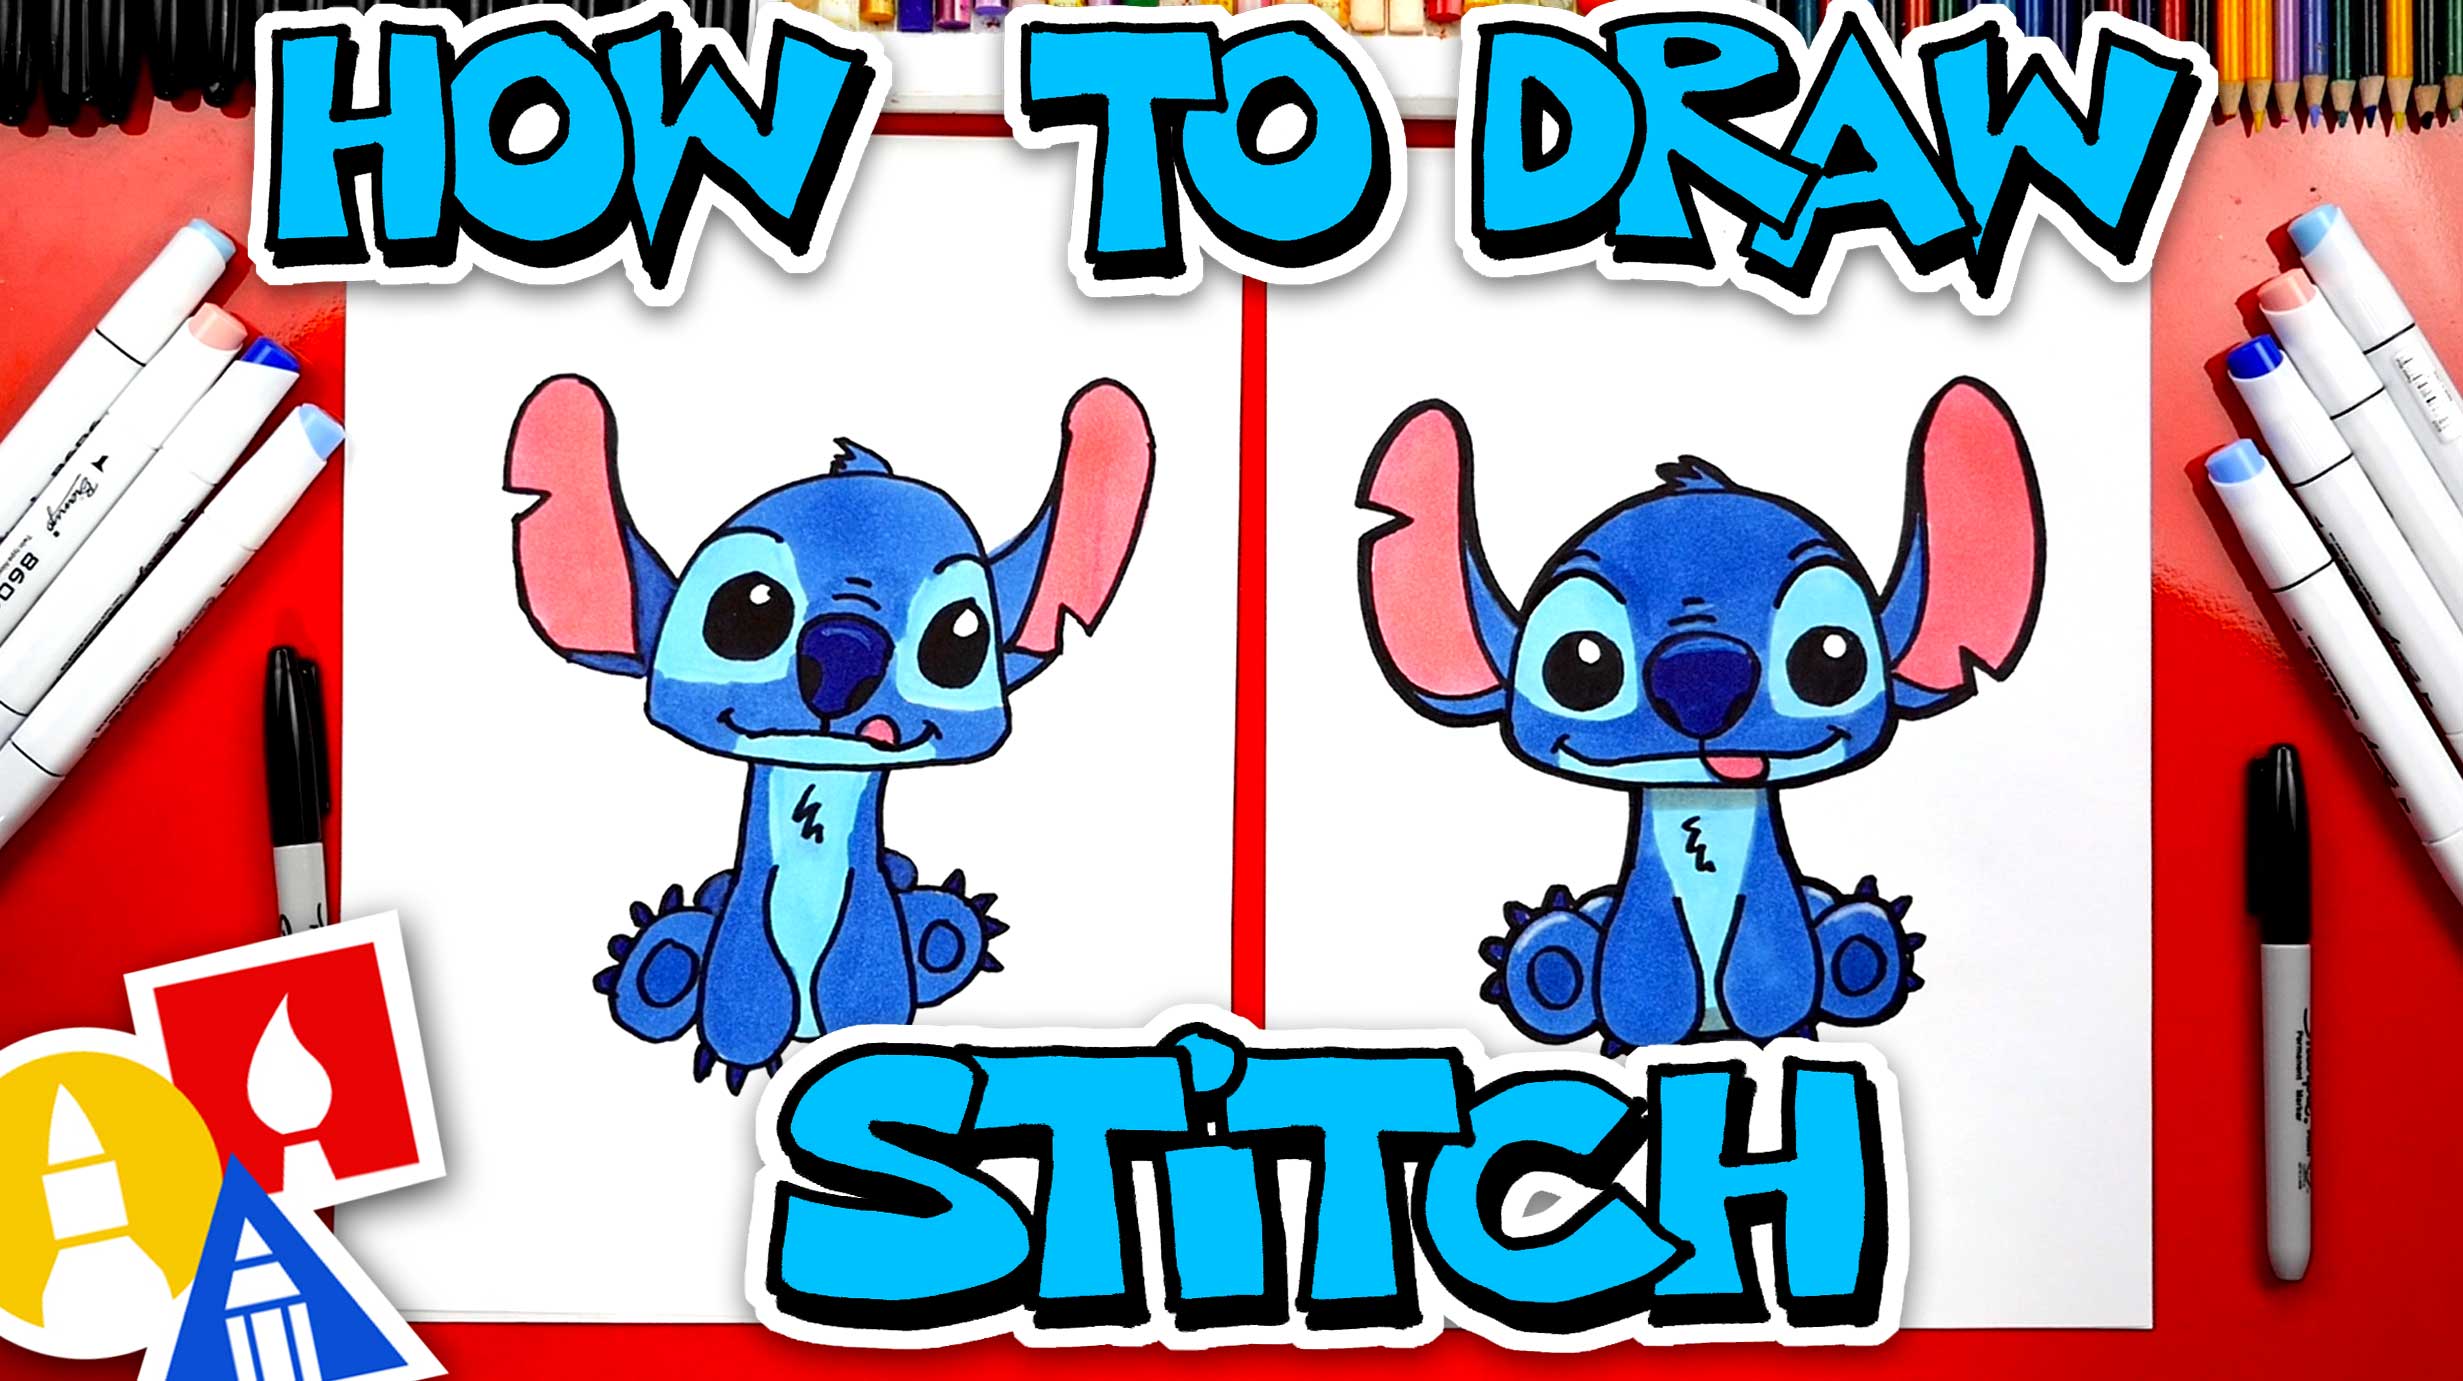
Mastering Stitch: Your Ultimate Guide To Drawing Lilo & Stitch's Lovable Alien
Welcome, aspiring artists and Disney enthusiasts! Today, we're embarking on an exciting creative journey to learn how to draw Stitch from Lilo & Stitch. This isn't just about putting lines on paper; it's about capturing the mischievous charm and endearing personality of Experiment 626, one of Disney's most beloved characters. Whether you're a seasoned artist looking for a fun challenge or a complete beginner eager to dive into the world of cartooning, this comprehensive guide is designed to make your Stitch drawing experience enjoyable and successful.
Drawing Stitch can be incredibly rewarding, offering a delightful break from more traditional subjects. His unique design, with his large eyes, distinctive ears, and expressive face, provides ample opportunity for creativity. We hope you follow along with us, step by step, as we break down the process into manageable, easy-to-understand stages. All you need is something to draw with, paper, and your favorite coloring supplies. Let's get ready to bring this adorable alien to life on your page!
Table of Contents
- The Endearing Charm of Stitch: Why Draw Him?
- Essential Supplies for Your Stitch Drawing Adventure
- Getting Started: The Foundation of Your Stitch Drawing
- Bringing Stitch's Face to Life: Eyes, Nose, and Mouth
- Adding Distinctive Details: Ears, Scars, and Fur Tufts
- Posing Your Stitch: Symmetrical vs. Dynamic
- The Art of Coloring Your Stitch Masterpiece
- Beyond the Basics: Tips for an Easy and Enjoyable Drawing Experience
- Frequently Asked Questions About Drawing Stitch
The Endearing Charm of Stitch: Why Draw Him?
Stitch, officially known as Experiment 626, is a fictional character who first captivated audiences in Disney's 2002 animated film, *Lilo & Stitch*. Created by Dr. Jumba Jookiba, Stitch was designed to be an unstoppable force of destruction, a creature of pure chaos. However, his journey takes an unexpected turn when he crash-lands on Earth and is adopted by a young Hawaiian girl named Lilo Pelekai. It is through Lilo's unwavering love and belief in "Ohana" (family) that Stitch begins to transform, learning about compassion, loyalty, and what it truly means to belong.
What makes Stitch such a compelling character to draw? It's his unique blend of mischievous behavior and profound emotional depth. He's marked by his short temper and destructive tendencies, yet these traits are often endearing because they are balanced by his fierce loyalty and growing affection for Lilo. This duality makes him incredibly expressive and fun to depict. His design is iconic: large, expressive eyes, prominent ears, a wide mouth with sharp teeth, and a generally squat, powerful build. Artists, from beginners to seasoned pros, find joy in capturing his various moods, from playful to grumpy, curious to protective. Drawing Stitch allows you to explore dynamic poses and exaggerated features, which are hallmarks of engaging character art.
For many, drawing Stitch is also a nostalgic trip back to a beloved movie that taught us about acceptance and family. He's not your typical prince or princess; he's an alien experiment who finds his place, proving that even the most unconventional characters can be the most lovable. So, take a break from those royal artworks and try your hand at a neat drawing of Stitch, the lovable alien from Disney’s Lilo & Stitch.
Essential Supplies for Your Stitch Drawing Adventure
Before we dive into the steps of how to draw Stitch drawing, let's gather our tools. The beauty of drawing is that you don't need a vast array of expensive equipment to get started. Simplicity is key, especially when you're learning. We're aiming for accessibility, so feel free to use whatever you have readily available in your home or classroom. The most important thing is to have fun and be comfortable with your chosen medium.
- Movierulzkannada 2023
- Is Luke Bryan A Democrat Or A Republican
- Rulz Movie 2023
- Mkvcinemas Com 2024
- Movierlz
Here's a list of the basic supplies that will be perfect for your Stitch drawing:
- Something to Draw With:
- Pencil: A good old graphite pencil (HB or 2B are great for sketching) is your best friend. It allows for light guide lines that can be easily erased, which is crucial for building your drawing.
- Sharpie (or similar marker): Once your sketch is perfected, a fine-point black marker like a Sharpie is excellent for outlining your drawing, making it pop and ready for coloring.
- Digital Stylus/Pen: If you're drawing on an iPad Pro using Procreate, as some artists do, a stylus is your equivalent. The principles remain the same whether you're digital or traditional.
- Paper:
- Any standard drawing paper will do. We often use marker paper because it handles ink and markers well without bleeding through, but regular printer paper or sketchpad paper is perfectly fine for practice and initial sketches.
- Coloring Supplies:
- Crayons: A classic choice, easy to use, and great for vibrant colors.
- Colored Pencils: Offer more control over shading and detail.
- Markers: Provide bold, even color.
- Watercolors: For a softer, more blended look.
- Digital Brushes: For digital artists, a variety of brushes will allow you to add color and texture.
- Eraser: An essential tool! You'll be using it frequently to clean up guide lines and correct mistakes. A kneaded eraser is fantastic for lifting graphite without damaging the paper.
Remember, this is a list of the supplies we used, but feel free to use whatever you have. The goal is to make art accessible and enjoyable, not to create barriers.
Getting Started: The Foundation of Your Stitch Drawing
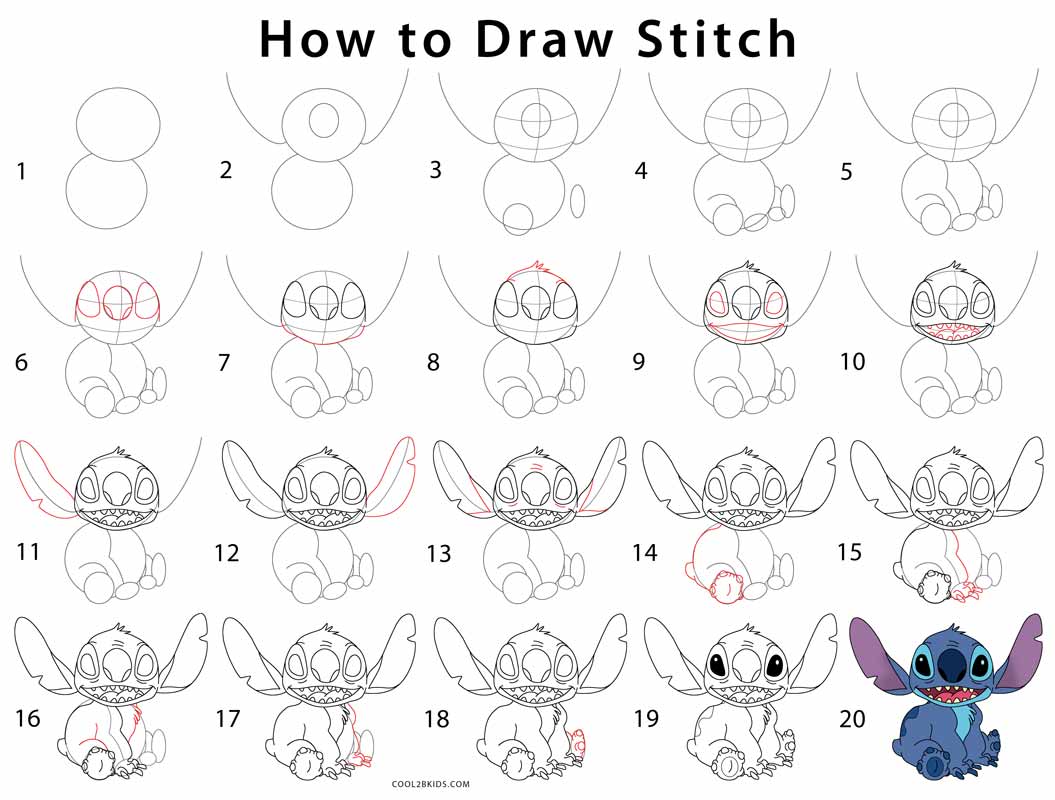
Every great drawing begins with a solid foundation. For our Stitch drawing, we'll start with basic shapes and guide lines. These initial strokes are like the blueprint of your artwork; they don't have to be perfect, but they provide the structure upon which you'll build the details. This tutorial shows how to draw him sitting in a nice, symmetrical fashion, which is an excellent pose for beginners to master. If students focus on making his shapes evenly balanced, they are bound to end up with a really nice drawing of this popular movie character.
Laying the Groundwork: Head and Body Guides
The first step in how to draw Stitch drawing is to establish the main forms:
- Start with the Head: To draw Stitch, begin with a circle that’s a little bit squished down. You don't have to draw the circle perfectly; it’s just a guide for Stitch’s head. Think of it as an oval that's wider than it is tall, or a slightly flattened sphere. This initial shape helps define the overall size and orientation of his head.
- Add Guide Lines for Facial Features: Inside the squished circle, draw two lines: one vertical and one horizontal. When drawing the lines, bend them slightly so that they contour to the shape of the sphere. These lines are crucial for placing Stitch's eyes, nose, and mouth accurately later on. The vertical line will help you center his face, while the horizontal line will guide the placement of his eyes.
- Establish the Body: Below the head, draw another larger, more rounded shape for his body. Stitch has a somewhat pear-shaped or bean-shaped body, wider at the bottom and tapering slightly towards the neck. Connect this body shape to the head with short, curved lines for his neck.
Structuring the Limbs: Arms and Legs
Next, we'll add the basic shapes for Stitch's limbs. Remember, these are still guide lines, so keep them light:
- Arms: From the upper sides of his body, draw two curved lines extending outwards and downwards for his arms. Stitch's arms are relatively short and thick. Add simple rounded shapes for his hands at the end of these lines.
- Legs: Draw the legs for Stitch according to the following steps. Step 10 in the reference data implies drawing the legs. For a sitting pose, his legs will be bent. Draw two rounded, somewhat oval shapes extending from the lower part of his body. These will be his thighs. Then, add smaller, more elongated oval shapes for his lower legs, bending at the "knees."
- Feet: At the end of his lower legs, draw simple, rounded shapes for his feet. Stitch has three toes on each foot, so keep that in mind for later details.
At this stage, your drawing should look like a collection of basic geometric shapes forming the silhouette of Stitch. Don't worry about perfection; focus on getting the proportions and placement right.
Bringing Stitch's Face to Life: Eyes, Nose, and Mouth
Stitch's face is where his personality truly shines. There is quite a bit of detail to add in here, so take your time and refer to your guide lines. Detailing Stitch's face is one of the most rewarding parts of the how to draw Stitch drawing process.
The Expressive Eyes of Experiment 626
Stitch's eyes are large and central to his character's expressiveness:
- Eye Placement: Using the horizontal guide line you drew earlier, draw two large, half or full ovals for the eyes. These should be quite prominent and spaced slightly apart, but not too far. Think about the "irregular rounded shapes" mentioned in the data; they don't have to be perfect circles.
- Irises and Pupils: For the eyes, draw three successively smaller, irregular rounded shapes, one within the other. The outermost shape is the white of the eye, the next is the iris (which is dark blue/black for Stitch), and the innermost is the pupil (usually a small, bright highlight or white dot). This layering creates depth and life in his gaze.
- Eyelids/Brows: Add subtle curved lines above the eyes to indicate his brow ridge, which contributes to his often-grumpy or mischievous expression.
Crafting Stitch's Signature Nose and Mouth
These features further define Stitch's unique look:
- The Nose: Draw a large circle for the nose, using curved lines to indicate the nostrils. This circle should be placed centrally, just below the horizontal eye guide line and above the vertical center line. Stitch's nose is quite prominent and somewhat pig-like. The nostrils are simple curved slits.
- The Mouth: Draw in the mouth line, along with teeth. Stitch's mouth is wide and often shows his sharp, pointed teeth. The mouth line can be a simple curved line for a neutral expression, or a wide, open "U" shape if he's smiling or growling. Add small, triangular or pointed shapes for his teeth along the inside of the mouth line.
- Cheeks and Chin: Add subtle curved lines to define his chubby cheeks and chin, connecting them to the main head shape.
Detail Stitch's face, erasing guide lines as necessary as you go. This iterative process of drawing, refining, and erasing is fundamental to achieving a clean and accurate drawing.
Adding Distinctive Details: Ears, Scars, and Fur Tufts
Now that the main forms and facial features are in place, it's time to add the specific details that make Stitch instantly recognizable. These elements are crucial for capturing his unique character and adding depth to your how to draw Stitch drawing.
- Stitch's Ears: Add the guides for Stitch's ears by first drawing two vertical lines on top of the head. Pay attention to the length of these lines in relation to the circle. Stitch's ears are very long and distinctively shaped.
- On the left side, draw a long line that curves out and down and meets the circle at the bottom. This forms the outer edge of his ear. Repeat for the right side, ensuring symmetry if you're aiming for a balanced pose.
- Then, draw the inner lines of the ears, mimicking the outer curve but slightly inside, to give them thickness and dimension. His ears often have a slightly ragged or worn look at the edges, which you can hint at with small, irregular curves.
- Scars and Chipped Ears: Add some scars for Stitch, who has some chipped or scarred portions on his ear. These small details add to his backstory as an "experiment" and give him a more rugged appearance. You can represent these with small, jagged lines or slight indentations on the edges of his ears or elsewhere on his body.
- Fur Tufts: Add in the little tuft of fur sticking up at the top of Stitch's head. This is a small but iconic detail, usually depicted as a few spiky, curved lines. You can also add subtle hints of fur texture on his cheeks or body with short, light strokes.
- Claws and Paw Pads: Go back to his hands and feet. Stitch has sharp claws on his fingers and toes. Add three pointed claws to each digit. For his feet, you can also add small, rounded shapes for his paw pads on the underside.
- Spikes on Back: Although not explicitly mentioned in the data, Stitch typically has a few small spikes or spines running down his back. If you're drawing a full body, consider adding these for completeness.
These details are what truly bring your Stitch drawing to life, making him more than just a collection of shapes but a recognizable character.
Posing Your Stitch: Symmetrical vs. Dynamic
The pose you choose for your Stitch drawing can dramatically impact the final look and feel of your artwork. The reference data mentions that this tutorial shows how to draw him sitting in a nice, symmetrical fashion. This is an excellent starting point for beginners because it simplifies the proportions and balance, making it easier to achieve a really nice drawing of this popular movie character. When shapes are evenly balanced, the overall composition feels harmonious and correct.
However, Stitch is a character of immense energy and expression. While a symmetrical sitting pose is great for learning the fundamentals, don't be afraid to explore more dynamic poses once you're comfortable. For instance, the data also mentions that these characters love to perform a Hawaiian dance, and that is what they’re doing in this Lilo and Stitch drawing. This pose is great, but it can also be quite tricky to draw.
Here are some considerations for posing your Stitch:
- Symmetrical Pose (Sitting):
- Benefits: Easier to maintain correct proportions, less challenging for beginners, results in a clean and balanced drawing.
- Focus: Ensure limbs are equally positioned, facial features are centered, and the overall form is stable.
- How to achieve: Rely heavily on your initial guide lines, especially the vertical center line, to mirror elements on both sides.
- Dynamic Pose (Hawaiian Dance, Action):
- Benefits: Captures Stitch's energetic personality, allows for more expressive storytelling, adds movement and excitement to your drawing.
- Challenges: Requires a better understanding of anatomy in motion, foreshortening (when parts of the body appear shorter due to perspective), and balance.
- How to approach:
- Start with a "line of action" – a curved line that dictates the flow and energy of the pose.
- Use simple stick figures or "mannequins" to block out the pose before adding volume.
- Exaggerate! Cartoons thrive on exaggeration, so don't be afraid to push his movements.
- Reference: Look at screenshots or official art of Stitch in various action poses to understand how his body bends and stretches.
Even if you start with a symmetrical pose, you can subtly tweak his head tilt or arm position to add a touch of personality without making it overly complex. The key is to understand the character's core shapes and then manipulate them to convey emotion or action.
The Art of Coloring Your Stitch Masterpiece
Once you've completed your line art, the next exciting step is to bring your Stitch drawing to life with color! Coloring adds depth, dimension, and personality to your artwork. Let’s color to complete the picture. The reference data mentions using various coloring supplies, and the choice is entirely yours based on your preference and what you have available.
Here’s a guide to coloring your Stitch, focusing on his iconic palette:
- Stitch's Primary Color: Blue!
- Stitch is predominantly a vibrant blue. Choose a medium to dark blue for his main body.
- Apply the color evenly within the outlined areas. If using crayons or colored pencils, you can press harder for darker areas (like shadows) and lighter for highlights. Markers will give a more uniform, flat color.
- Inner Ear and Belly: Lighter Blue/Teal
- His inner ears and the patch on his belly are a lighter, sometimes slightly greenish-blue or teal. This contrast adds visual interest.
- Carefully color these areas, ensuring you stay within the lines you've drawn for these specific details.
- Nose and Claws: Dark Blue/Black
- Stitch's nose is typically a very dark blue, almost black. His claws are also dark.
- Use a dark blue or black marker/pencil for these features to make them stand out.
- Eyes: Black and White Highlights
- The large part of his eyes (the iris) is black. The pupil is usually a tiny white highlight or dot, giving his eyes a sparkling, alive quality.
- Color the main eye area black, then carefully leave a small white circle or dot for the highlight.
- Mouth and Tongue: Pink/Red
- If his mouth is open, the inside of his mouth can be a dark red or brownish-red. His tongue, if visible, is typically pink.
- Shading (Optional but Recommended):
- To make your Stitch drawing truly pop, consider adding some simple shading. Imagine where light would hit Stitch and where shadows would naturally fall (e.g., under his chin, on the underside of his limbs, within the folds of his ears).
- Use a slightly darker shade of blue or even a light purple for the shadows. Apply these colors lightly and blend them if possible to create a smooth transition.
Take your time with the coloring. It's the final touch that brings your character to life and makes your how to draw Stitch drawing truly complete. Experiment with different pressures and layering techniques to achieve the desired effect.
Beyond the Basics: Tips for an Easy and Enjoyable Drawing Experience
Learning how to draw Stitch drawing, or any character, is a journey. It's about practice, patience, and embracing the process. Here are 3 more tips to make your Lilo and Stitch drawing easy and ensure you have a fun and rewarding experience:
- Don't Fear the Eraser: Your pencil and eraser are a team. Don't be afraid to make mistakes or draw light guide lines that you'll erase later. In fact, it's encouraged! The process of sketching, refining, and erasing guide lines as necessary is fundamental to building a clean and accurate drawing. It allows you to experiment with shapes and proportions until you get them just right. Think of your initial lines as whispers, and your final lines as shouts.
- Focus on Shapes, Not Details (Initially): When you start, resist the urge to immediately draw the eyes, nose, and mouth. Instead, focus on the fundamental shapes of Stitch's head, body, and limbs. Get the overall proportions and pose correct first. Once the "skeleton" of your drawing is solid, then you can confidently add the smaller, intricate details like the scars, fur tufts, and the three successively smaller, irregular rounded shapes for the eyes. This hierarchical approach prevents your drawing from looking disproportionate or "off."
- Practice, Practice, Practice: The more you draw, the better you'll become. You will easily draw these beloved characters with these tips for your Lilo and Stitch sketch. Don't get discouraged if your first attempt isn't perfect. Every drawing is a learning experience. Try drawing Stitch from different angles, in different poses (like the Hawaiian dance pose mentioned, even if it's tricky), or even expressing different emotions. Consistency is key to improvement.
Embracing Imperfection: Your Drawing Journey
Remember, art is about expression, not just perfection. While aiming for a really nice drawing of this popular movie character is a great goal, also allow yourself to enjoy the process. It may seem monotonous to always draw a princess with shiny tiaras and frilly gowns, so take a break from those royal artworks and try your hand at a neat drawing of Stitch. His unique design offers a refreshing change of pace and a chance to explore a different kind of character.
Every artist, no matter how skilled, started somewhere. Embrace the learning curve, celebrate your progress, and most importantly, have fun learning how to draw him here today. Whether you're a beginner or just love drawing cute characters, this guide is here to support you.
Frequently Asked Questions About Drawing Stitch
As you embark on your Stitch drawing journey, you might have some common questions. Here are answers to some frequently asked questions to help you along the way:
- Q: Is Stitch hard to draw for beginners?
- A: Not at all! While Stitch has distinctive features, his design is built upon simple, rounded shapes. By breaking down the process into easy, simple, cartooning steps, as we've done in this guide, even beginners can achieve a great result. Focusing on symmetrical poses first makes it even easier.
- Q: What's the most important part of drawing Stitch's face?
- A: His eyes and nose are arguably the most crucial for capturing his likeness. The large, expressive eyes with their layered shapes, and the prominent, circular nose with curved nostrils, are key identifiers. Getting these right will make your Stitch instantly recognizable.
- Q: How do I make my Stitch drawing look more "Stitch-like" and less generic?
- A: Pay close attention to the unique details: his long, expressive ears (and any chipped portions), the little tuft of fur on his head, his wide mouth with sharp teeth, and his three-toed feet. These small additions are what truly define him. Also, capturing his mischievous or endearing expression through his eyes and mouth will add character.
- Q: What if my lines aren't perfect circles or straight?
- A: That's perfectly fine! As mentioned, "You don't have to draw the circle perfectly." Initial guide lines are just that—guides. They are meant to be light and refined later. Even the final outlines can have a natural, hand-drawn quality. Focus on the overall shape and proportion rather than obsessing over perfectly smooth lines.
- Q: Can I draw Stitch in different poses or expressions?
- A: Absolutely! Once you're comfortable with the basic structure, experiment. Stitch is incredibly expressive, and capturing his various moods (happy, angry, curious, sad) or actions (like performing a Hawaiian dance) is a fantastic way to develop your skills. Start by observing how his face and body change in different movie scenes.
- Q: What's the best way to practice drawing Stitch?
- A: Consistent, short drawing sessions are often more effective than infrequent long ones. Try drawing Stitch once a day for a week, even if it's just a quick sketch. Use reference images from the movie or official art. Join online communities or follow along with video tutorials (like those from "Art for Kids Hub" or "Artist Station where new how to draw videos are uploaded daily") to get different perspectives and tips.
Keep these tips in mind as you continue your artistic journey. Every stroke is a step forward!
Final Thoughts on Your Stitch Drawing Journey
We've covered a lot of ground in this guide on how to draw Stitch drawing, from gathering your essential supplies to adding those crucial details and bringing him to life with color. Remember, drawing is a skill that develops with practice and patience. Stitch, also known by his birth

How to Draw Stitch Step by Step | Stitch drawing, Disney drawing
How To Draw Stitch From Lilo And Stitch - Art For Kids Hub
How to Draw Stitch (Step by Step Pictures) | Cool2bKids
