How To Set Up Raspberry Pi Remote Desktop On Windows Using RDP
Introduction: The Convenience of Remote Access
Using a remote desktop is a very convenient way to control your Raspberry Pi from another computer. Whether you're following tutorials on this website or managing projects from afar, having remote access means you don’t need to physically sit in front of your Raspberry Pi to use it. In this guide, we will show you how to set up a remote desktop connection with your Raspberry Pi using RDP (Remote Desktop Protocol) on a Windows PC.
RDP is Microsoft’s proprietary network protocol that allows users to access the full desktop environment of a remote computer. This means you can log into your Raspberry Pi from any Windows, Linux, or macOS system and interact with it as if you were using a local computer. If you don’t want to dedicate a monitor or TV to your Raspberry Pi but still want to use it effectively, this tutorial is for you.
Why Use Remote Desktop for Raspberry Pi?
Imagine working hard on your Raspberry Pi, but suddenly needing to access your Windows computer. It’s on the other side of the house or even upstairs. Switching back and forth between devices can be inconvenient, especially if you’re in the middle of a project. With remote desktop software, you can control your Raspberry Pi from another device on your local network without needing to stop what you’re doing.
There are two types of remote desktop software:
- Local: Requires you to be on the same network as the Raspberry Pi.
- Remote: Allows access over the internet, provided you configure your router and network settings properly.
By default, remote connections are turned off on Raspberry Pi OS. This guide will walk you through enabling and configuring remote desktop access using RDP.
Setting Up Remote Desktop on Raspberry Pi
Step 1: Enable Remote Desktop on Raspberry Pi
Before you can access your Raspberry Pi remotely, you need to enable remote desktop functionality on the device. Follow these steps:
- Morgan Ortagus Weight Loss
- Mar%C3%ADa Elvira Murillo
- Pornhwa
- Sherien Almufti Net Worth
- Jameliz Smith Leaks
- Boot up your Raspberry Pi and log in to the desktop environment.
- Open the Raspberry Pi Configuration tool by clicking on the menu in the top-left corner, then navigating to Preferences > Raspberry Pi Configuration.
- In the Interfaces tab, scroll down to the Remote Connections section.
- Enable the option for Remote Connections and click OK.
- Reboot your Raspberry Pi to apply the changes.
Once this is done, your Raspberry Pi is ready to accept RDP connections.
Step 2: Install an RDP Client on Your Windows PC
To connect to your Raspberry Pi from a Windows PC, you’ll need an RDP client. Microsoft includes a built-in RDP client with Windows, but for Raspberry Pi, we recommend using a third-party client like RealVNC Viewer.
- Head over to RealVNC.com/connect/download/viewer/ and download the Windows version of the VNC Viewer.
- Run the installer and follow the straightforward installation process.
RealVNC Viewer is a secure remote access solution for Raspberry Pi OS, allowing you to control your device from anywhere on your local network.
Step 3: Connect to Your Raspberry Pi
Now that both your Raspberry Pi and Windows PC are set up, it’s time to establish the connection:
- Open the RealVNC Viewer application on your Windows PC.
- In the address bar, type the IP address of your Raspberry Pi. You can find the IP address by running the command
hostname -Iin the terminal on your Raspberry Pi. - Click Connect.
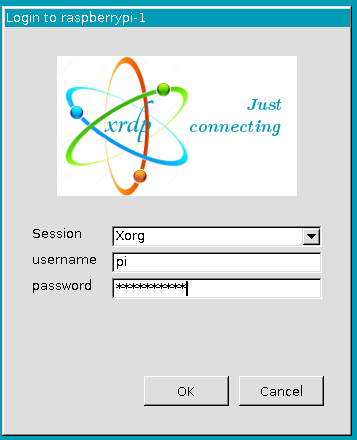
- Enter your Raspberry Pi’s username and password when prompted.
Once connected, you’ll see the desktop environment of your Raspberry Pi on your Windows PC. You can now interact with it as if you were sitting right in front of it.
Alternative Methods for Remote Access
While RDP is a powerful tool, there are other methods you can use to access your Raspberry Pi remotely:
- SSH (Secure Shell): Provides secure access to a terminal session on your Raspberry Pi. It’s ideal for text-based tasks and doesn’t require a graphical interface.
- VNC (Virtual Network Computing): Offers a graphical interface similar to RDP but is often easier to set up for beginners.
- XRDP: Another RDP solution specifically designed for Linux systems, including Raspberry Pi OS. XRDP allows you to connect to your Raspberry Pi from Windows, Linux, or macOS.
For each method, we’ll explain how to set it up on your Raspberry Pi and how to access it from any operating system (Windows, Linux, Mac, and even from your smartphones).
Setting Up XRDP
In this section, let’s explore XRDP, a popular alternative to RealVNC Viewer:
- Open the terminal on your Raspberry Pi.
- Update your package list by running
sudo apt update. - Install XRDP by running
sudo apt install xrdp. - Reboot your Raspberry Pi with
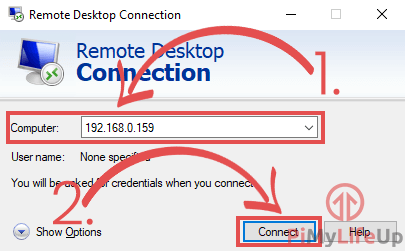
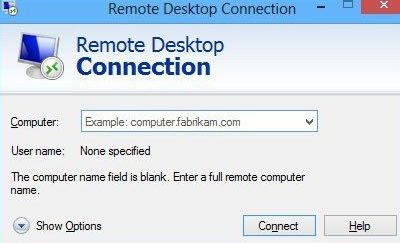
sudo reboot. - On your Windows PC, open the built-in Remote Desktop Connection app.
- Enter the IP address of your Raspberry Pi and click Connect.
XRDP provides a seamless desktop experience and is a great option if you prefer using Microsoft’s native RDP client.
Troubleshooting Common Issues
If you’re having trouble setting up remote desktop access, here are some common issues and solutions:
- Unable to Connect: Ensure that your Raspberry Pi and Windows PC are on the same network. Double-check the IP address you’re using to connect.
- Authentication Errors: Make sure you’re entering the correct username and password for your Raspberry Pi.
- Slow Performance: If the connection is lagging, try reducing the resolution or disabling visual effects in the RDP settings.
For more advanced troubleshooting, consult the official Raspberry Pi documentation or seek help from online forums.
Conclusion: Streamline Your Workflow with Remote Desktop
In this Raspberry Pi remote desktop tutorial, we’ve covered the steps to set up your Raspberry Pi to accept connections from the Remote Desktop Protocol (RDP). Whether you’re using RealVNC Viewer, XRDP, or another method, remote desktop access allows you to control your Raspberry Pi from anywhere on your local network—or even over the internet with proper configuration.
This guide demonstrates how to set up a remote desktop connection with a Raspberry Pi using RDP on a Windows PC. By following these steps, you can streamline your workflow, follow tutorials on this website, and apply your knowledge to real-world projects without needing to dedicate a monitor or TV to your Raspberry Pi.
Remember, if you encounter any issues, don’t hesitate to revisit the troubleshooting section or explore alternative methods like SSH or VNC. With remote desktop access, the possibilities for your Raspberry Pi projects are endless!
How to Setup Raspberry Pi Remote Desktop - Pi My Life Up
5 Ways to Remote Desktop on Raspberry Pi (Windows/Linux/Mac
Microsoft Remote Desktop from Windows to Raspberry Pi – remote.it
