Dive In! Master How To Draw A Shark Like A Pro
Ever gazed upon the majestic, powerful form of a shark and wished you could capture its formidable beauty on paper? Learning how to draw a shark can seem daunting at first, given their sleek, streamlined bodies and intricate features, but with the right guidance, it's an incredibly rewarding artistic journey. This comprehensive guide is designed to demystify the process, offering step-by-step instructions that cater to both eager beginners and seasoned art enthusiasts looking to refine their marine life sketches. Whether you're aiming for a fierce, realistic great white or a cute, playful cartoon shark, we'll equip you with the knowledge and techniques to bring these magnificent creatures to life on your canvas. Get ready to embark on an underwater art expedition!
From sketching the basic overall body shape to adding intricate details like gills and teeth, this tutorial will walk you through every essential stage. We’ll explore various shark types, share tips for different skill levels, and even delve into the art supplies we love. By the end of this guide, you’ll not only know how to draw a shark with confidence but also appreciate the fascinating anatomy that makes them such incredible subjects for art. So, grab your drawing tools, and let's start sketching!
Table of Contents
- Why Draw Sharks? Unveiling Their Artistic Appeal
- Getting Started: Essential Art Supplies for Your Shark Drawing Adventure
- The Fundamentals: Basic Shapes for Your Shark
- Step-by-Step Guide: Drawing a Realistic Shark
- Exploring Different Shark Types: Great White, Grey Reef, and Megalodon
- Tips for Drawing Sharks for Kids and Beginners
- Beyond the Basics: Advanced Techniques and Polishing Your Artwork
- Conclusion: Your Shark Drawing Journey Continues
Why Draw Sharks? Unveiling Their Artistic Appeal
Sharks have captivated human imagination for centuries. Their powerful presence, sleek design, and mysterious underwater world make them an incredibly compelling subject for artists. When you learn how to draw a shark, you're not just sketching an animal; you're capturing a symbol of strength, adaptability, and the raw beauty of nature. For art enthusiasts and marine life aficionados, the shark offers a unique challenge and immense satisfaction. Their interestingly shaped bodies, from the pointed snout of a grey reef shark to the massive, iconic profile of a great white, provide a fantastic exercise in understanding form and movement. Drawing sharks also allows you to delve into the nuances of light and shadow on a smooth, cartilaginous surface, and to explore the dynamic energy of an apex predator. It's an ideal subject for developing your skills in anatomy, perspective, and creating a sense of realism or character, depending on your chosen style.Getting Started: Essential Art Supplies for Your Shark Drawing Adventure
Before you dive into the specifics of how to draw a shark, it's crucial to gather the right tools. Having quality art supplies can significantly enhance your drawing experience and the final outcome. While you don't need a professional studio setup, a few key items will make a world of difference:- Pencils: A range of graphite pencils (e.g., HB, 2B, 4B, 6B) will allow you to create varying line weights and shading depths. HB is great for initial sketches, while softer leads (B series) are perfect for darker lines and shadows.
- Paper: Choose a smooth, durable drawing paper that can withstand erasing and layering. A good quality sketch pad or individual sheets will do.
- Eraser: A kneaded eraser is excellent for lifting graphite gently without smudging, and a vinyl eraser (like a Staedtler Mars Plastic) is superb for clean, precise corrections. Remember to start by drawing lightly so that you can easily erase if there are mistakes.
- Blender (Optional): A blending stump or tortillon can help you smooth out graphite and create seamless transitions in your shading.
- Reference Images: High-quality photographs or videos of sharks are invaluable. Observe their anatomy, how their fins are positioned, and the subtle curves of their bodies.
The Fundamentals: Basic Shapes for Your Shark
Every successful drawing, especially when learning how to draw a shark, begins with understanding fundamental shapes. Breaking down a complex subject into simpler forms makes the drawing process much more manageable and helps ensure correct proportions. This initial step is crucial for establishing the overall body shape and placing all those fins in just the right places.Cartoon Shark Basics: Super Easy for Kids
If you're looking for an easy art tutorial for beginners or want to learn how to draw a shark super easy for kids, starting with a cartoon shark is a fantastic approach. It simplifies the anatomy while still capturing the essence of the creature. To draw a cartoon shark, you can start with a very simple structure:- Body: Draw a big oval shape for the shark’s body. This will be the main part of the shark. Try to make the oval slightly longer to capture the streamlined look. This shape serves as a reference for the body of your shark.
- Head/Snout: On the left side of the oval, draw a curved triangle extending to the left for the snout.
- Tail: On the right side of the circle (or oval), draw a curved triangle, and then sketch a fishtail onto the end of the bottom triangle. This forms the caudal fin.
- Fins: Add simple triangular or rounded fins for the dorsal (top), pectoral (side), and pelvic (bottom) fins.
Realistic Shark Foundation: Building a Credible Form
For those aiming for a more realistic shark pencil drawing, the basic shapes are still your starting point, but they need to be more nuanced. Our first shark is often drawn from the basic fish shape, but a shark's anatomy is unique. Start by drawing the basic shape of the shark’s body. Think of it as a elongated, slightly flattened oval or a cigar shape that tapers towards the tail. A grey reef shark, for instance, has a sleek, streamlined body with a pointed snout. This initial outline should be drawn lightly so you can easily refine it later. This basic shape is critical for establishing the shark's powerful and hydrodynamic form.Step-by-Step Guide: Drawing a Realistic Shark
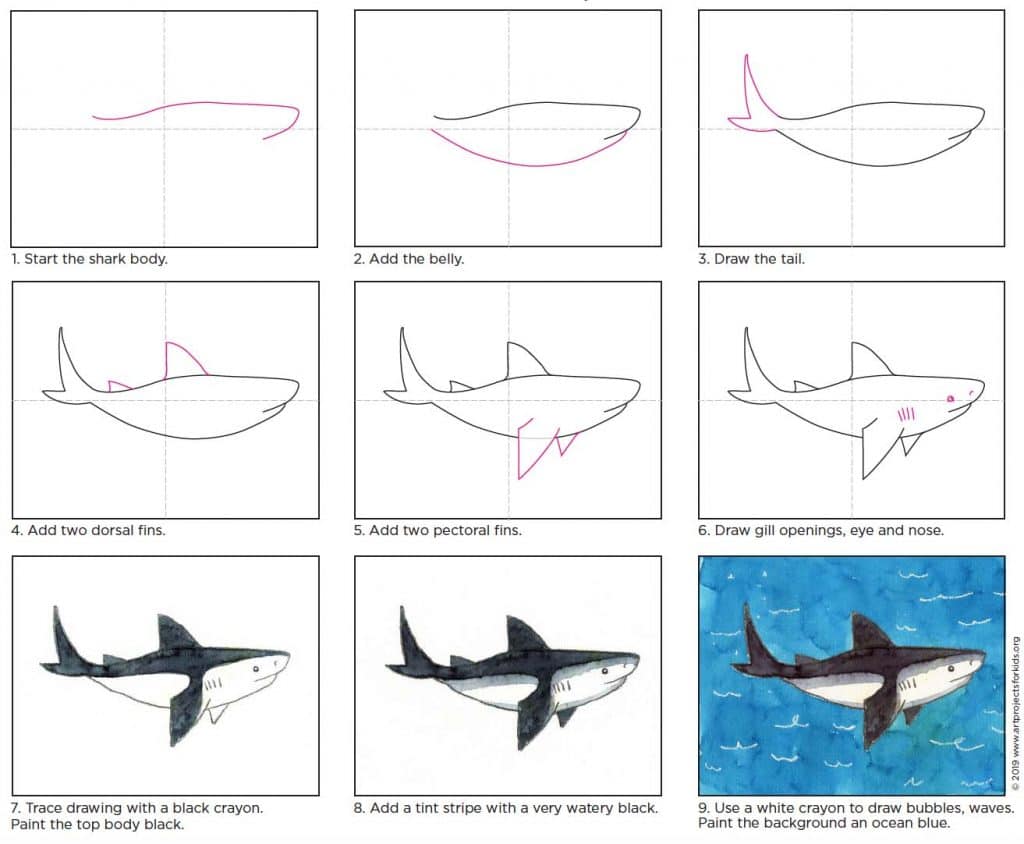
Learning how to draw a realistic shark requires attention to detail and a methodical approach. Follow these seven steps, and you'll be well on your way to creating a compelling shark drawing. You can also find our directed drawing printable template at the end of this drawing tutorial for extra guidance.Step 1: The Core Body Shape
Begin by lightly sketching the main body shape. As mentioned, think of a long, slightly flattened oval or a torpedo shape. The front should be slightly wider, tapering gracefully towards the tail. This initial outline sets the foundation for the entire drawing. Ensure it looks natural and streamlined, reflecting the shark's efficiency in water.Step 2: Adding the Fins
Fins are crucial for defining the shark's species and movement.- Dorsal Fin: This is the prominent fin on the shark's back. For many sharks, like the great white, it's large and triangular. Position it roughly in the middle of the shark's back, slightly closer to the head.
- Pectoral Fins: These are the large fins on either side of the body, just behind the gills. They are often wing-like and help with lift and steering.
- Pelvic Fins: Located on the underside of the shark, further back from the pectoral fins.
- Anal Fin (if applicable): Some shark species have a small anal fin near the tail.
- Caudal Fin (Tail): Sketch a fishtail onto the end of the bottom triangle (or the tapered body). This is the powerful propulsion unit. Similar to a leaf, the middle part of these two figures (the upper and lower lobes of the tail) should be rounded while the tip must be pointed.
Step 3: Defining the Head and Snout
The head shape varies significantly between shark species. For a realistic shark, gently refine the front of your initial body shape to form the snout. A grey reef shark, for example, has a pointed snout. Consider the subtle curves and how it transitions into the main body.Step 4: Eyes, Gills, and Mouth
Now, let's add the crucial details that bring your shark to life.- Eyes: Draw a small eye. Grey reef sharks have large, round eyes that are located on the sides of their heads. Position them carefully to convey the shark's gaze. For a fierce looking shark, you might add a short wavy line above for the eyebrow, giving it a more intense expression.
- Nostrils: Add subtle nostril openings near the front of the snout.
- Gills: Draw 5 gills in the middle of the shark’s body, just behind the head. These are typically vertical slits.
- Mouth: Sketch the mouth. For a great white, this would be a wide, curved line. Draw two jagged lines for the teeth and a curved line connecting them, hinting at the shark's formidable bite.
Step 5: Refining and Detailing
Now that all the main parts of the shark drawing are in place, go over the entire outline of the animal to refine and smooth the shapes. Make sure the fins, body, and tail look natural and fairly realistic. Pay attention to the subtle curves and muscle definition. This is where you transform your basic sketch into a recognizable shark. Clean up any extra lines or mistakes to give the shark drawing a polished and finished look.Step 6: Shading and Texture
Shading adds depth and realism. Sharks typically have a darker dorsal (top) side and a lighter ventral (bottom) side, a form of countershading that helps them blend into their environment.- Light Source: Determine where your light source is coming from.
- Gradual Shading: Apply graphite in smooth, gradual layers, building up darker tones where shadows would fall (e.g., under fins, on the underside of the body).
- Texture: While shark skin is relatively smooth, you can hint at its texture with very subtle, fine lines or stippling if you wish.
- Highlights: Leave some areas lighter to represent highlights, especially on the top surfaces that catch the light.
Exploring Different Shark Types: Great White, Grey Reef, and Megalodon
The world of sharks is incredibly diverse, and each species offers unique characteristics for drawing. Finding out how to sketch the body, fins, mouth, eyes, and gills of various shark types will expand your artistic repertoire. * Great White Shark: Known for its powerful, conical snout and large, triangular dorsal fin. When learning how to draw a realistic great white shark, focus on its robust body and formidable jawline. Its eyes are relatively small compared to its head. * Grey Reef Shark: Here are some tips for drawing a grey reef shark: Start by drawing the basic shape of the shark’s body. A grey reef shark has a sleek, streamlined body with a pointed snout and a large, triangular fin on its back. Next, add details like the eyes, nostrils, and gills. Grey reef sharks have large, round eyes that are located on the sides of their heads, giving them excellent peripheral vision. * Megalodon: For a historical and imaginative challenge, learn how to draw a megalodon. This extinct giant requires you to exaggerate features, focusing on immense size and an even more formidable jaw. You'll want to emphasize its sheer bulk and the implied power of its ancient form. Each shark has such an interestingly shaped body, and studying these differences will make your drawings more accurate and engaging.Tips for Drawing Sharks for Kids and Beginners
If you’re thinking “how can you draw a shark easily?” then this easy tutorial is perfect for you. It's a very easy art tutorial for beginners, only follow me step by step. If you need more time, take it! Art is not a race. * Start Simple: Don't try to draw a hyper-realistic shark on your first attempt. Begin with cartoon sharks or simplified outlines. * Draw Lightly: Always start with light pencil lines. This makes it easy to erase mistakes without damaging the paper. * Use Guides: Imagine invisible lines or use very light construction lines to help with symmetry and proportion. * Break It Down: As we've done, break the shark into basic shapes first (oval, triangles). * Practice Regularly: The more you draw, the better you'll become. Consistent practice is key to mastering how to draw a shark. * Watch Videos: Follow the red sketch lines, watch the video, and discover some interesting facts about sharks along the way. Many online resources offer visual step-by-step instructions. * Use Printable Templates: Follow the step by step instructions and watch the video to create your own shark drawing. Our shark drawing guide pdf worksheet (optional) can be a great resource. You can also print the pdf to make your own shark coloring page after you've drawn the outline. Kids can create their own shark with different features and expressions in four simple steps, fostering creativity and a love for marine life.Beyond the Basics: Advanced Techniques and Polishing Your Artwork
Once you've mastered the fundamentals of how to draw a shark, you can explore more advanced techniques to elevate your artwork. * Dynamic Poses: Instead of a static side view, try drawing sharks in motion – lunging, turning, or swimming. This involves understanding foreshortening and perspective. * Environmental Context: Place your shark in its natural habitat. Add water effects, light rays filtering through the ocean, or other marine life. This adds storytelling to your drawing. * Texture and Detail: Experiment with subtle textures for the shark's skin, scars, or reflections on its surface. For a fierce looking shark, emphasize the ruggedness and power. * Color Theory: If you're moving beyond pencil, explore how different shades of grey, blue, and white can create a sense of depth and realism in the underwater environment. * Refinement: After you've laid down the main shapes and details, take time to refine and smooth the shapes. Make sure the fins, body, and tail look natural and fairly realistic. Clean up any extra lines or mistakes to give the shark drawing a polished and finished look. This final polish makes a huge difference in the overall impact of your artwork. Remember, every artist's journey is unique. Don't be afraid to experiment and develop your own style.Conclusion: Your Shark Drawing Journey Continues
You've now embarked on an exciting underwater art expedition and learned the essential steps of how to draw a shark, from the basic oval shape to the intricate details of gills and teeth. Whether you started with a cute cartoon shark pencil drawing in 5 steps or tackled a realistic shark pencil drawing in 6 steps, you've gained valuable skills in capturing the formidable beauty of these incredible creatures. The journey of an artist is one of continuous learning and practice. We encourage you to keep sketching, experimenting with different shark types, and refining your techniques. The more you observe and draw, the more natural and expressive your artwork will become. If you found this guide helpful, please share it with fellow art enthusiasts or leave a comment below with your favorite shark drawing tip. We'd love to see your creations! For more drawing tutorials and artistic insights, be sure to explore other articles on our site. Keep drawing, and keep exploring the wonders of the deep!- Hollie Strano And Bradley Forward Still Together
- Harrison Bader Gay
- Vegamovies2
- Mkvmoviespoint All Quality And Hindi Dubbed Download
- Vegamovieslux

How To Draw A Shark In 9 Steps Coolguides Shark Drawing Easy – Bilarasa
How to Draw a Shark · Art Projects for Kids
How To Draw A Shark Step By Step
